Posted in Poetry Craft, Poetry Fun!

A Poem on a Kite – Craft and Poetry

Robert Couse-Baker, Flikr creative commons

Today I am going to show you how to write a poem about a kite, and then write your poem on a kite to hang from your ceiling or window!

This is a kite poem I have written in the past:


The Kite


I am the emperor of wind

my world is sky and sun


air surrounds me, guides me

moves me so we are one


my red skin glows like fire

I am kite; part silk, part light


my tail patterns in circles

in loops and swoops of flight


watch me become the wind

and the wind take shape in me


it is my soul, my life, my all

it sets my spirit free


© Liz Brownlee

In your poem, YOU are the kite. You will be thinking about what it would be like to be a kite flying in the sky, being moved by the wind.

Your first line will be I am a kite – in your second line, you will say where or how you fly. You will use a word for sound in this description. Think of the sounds a kite will hear up in the sky. It could be the sound of insects (what noise do they make?), or the wind, or aeroplanes, whatever sound you think the sun makes (make one up!), or the sound of the people down below, watching.

Your sound words could use onomatopoeia. This word is said: ono-matter-pee-a. No, I can’t spell it either, I had to look it up! These are words that SOUND like what they are describing: ‘The kite swished‘, ‘the wind buffeted the kite’. The words in bold describe the sound, and sound like the sound.

I have imagined what sound the air is making and put that:

I am a kite

I fly through the singing air

Your third line will describe what you (the kite) look like. You will use a metaphor – a metaphor describes something AS something else.  ‘The kite is a spiral of colours.’

I am a diamond

Your fourth line will describe what you are doing, using a verb (a doing word).

shining under

Your fifth line will describe the sky. I thought about what was in the sky as well as the kite – you could think about the colours in the sky, or the wind, or a smell, or clouds, but I remembered that even when it is daytime, the stars are still up there in the sky.

a sky of invisible stars

Your sixth and seventh lines will describe the wind with a simile (when you say something is ‘like’ something else) or a metaphor (when you say something ‘is’ something else). Think what the wind is like for the kite – some words which might help you are: friend, helper, song, home, life, fun, dancing partner, hero, path, direction, pattern.

The wind is like

a mother to me

Your eighth and ninth lines will describe how the wind helps the kite.

helping me to fly

and guiding me back home.

Yay! You’ve finished your poem. Read it out – can you hear anywhere where you could improve it, perhaps by taking out a word, putting one in, or changing a word for a better word? Does your poem make sense? Can you change it a little so it flows well?

This is mine, written out:


I am a kite

I fly through the singing air

I am a diamond

shining under

a sky of invisible stars

the wind is like

a mother to me

helping me to fly

and guiding me home.


You can write your poem neatly onto a piece of card or paper and hang it on the wall, you could draw a kite to go with it, or you can display it as a kite. Below are the instructions to do that.

First, you need to make your poem into a diamond shape. This is why you have an odd number of lines, one line has to be the middle. First of all you need to write your poem as I have below – so that the lines get steadily longer until the middle line, (probably line 5, which will be the longest line) and then shorter again. You will have to play with the words, adding some words from the lines above or below to get the shape correct. If it won’t work, then add words, or take some away. When you have finished, read your poem out to check you have not added a word in a line and still have it in the line above, for example – this is easy to do!

I am

a kite,

I fly through

the singing air. I am

a diamond, shining under

a sky of invisible stars. The wind

is like a mother to me,

helping me to fly

and guiding

me back

home.


Notice that in line 5, where I have added two words from the line below, I have shown where the line finishes by a full stop, to also show where the next line begins. You could also put in a comma.

When you have your shape right, all you have to do is draw a diamond on an A5 sheet of paper or card. You could do it on A4 if your have a lot of words and are worried about fitting them in!

How to draw a diamond shape! Measure and mark half way along the top and bottom of your paper, and half way down each side.

Join the marks with a ruler and pencil!

Then cut the kite out and place it on another piece of plain paper. Use the kite as a template to draw around.

Draw a line across the middle of your rough paper kite and then, again roughly, divide each half with 5 lines. You may need an adult to help with this. Then write your poem in on your rough piece of paper. Work out how to write the lines to fit your kite properly. It might take a while to do this! You may need to change where some of the words go. Don’t worry, you can’t get it wrong, as long as all your poem is on your kite!

Then put your kite next to the rough copy and copy your poem across. Notice I have tried out two pens to see which one would be the right thickness to write my poem in. I wrote the poem on the good kite in pencil again to guide my pen words. Then I rubbed out the pencil when it was dry.

Then it is time to add a tail to the kite. I had an old pipe-cleaner which I twisted into a spiral, but you can use lengths of ribbon, coloured string, wool, anything that looks like a kite tail and which you can attach to your kite! I attached the pipe-cleaner with sticky tape and then a staple.

Then a made a tiny bow from parcel ribbon to put on top of the staple – you could use wool or string or even cut out a bow out of magazine paper or coloured paper to stick there – but make sure it will not hide any of your words.

Thread a thick needle with some string, wool, embroidery thread or ribbon, knot the end and push it through near the edge (not too near the edge!) of your kite, a little way down the top side of the kite, either on the right or left. I put my hole between the third and fourth lines. This means your kite will hang at a jaunty angle.

And then you can hang it up!

Hope you enjoy yourself!

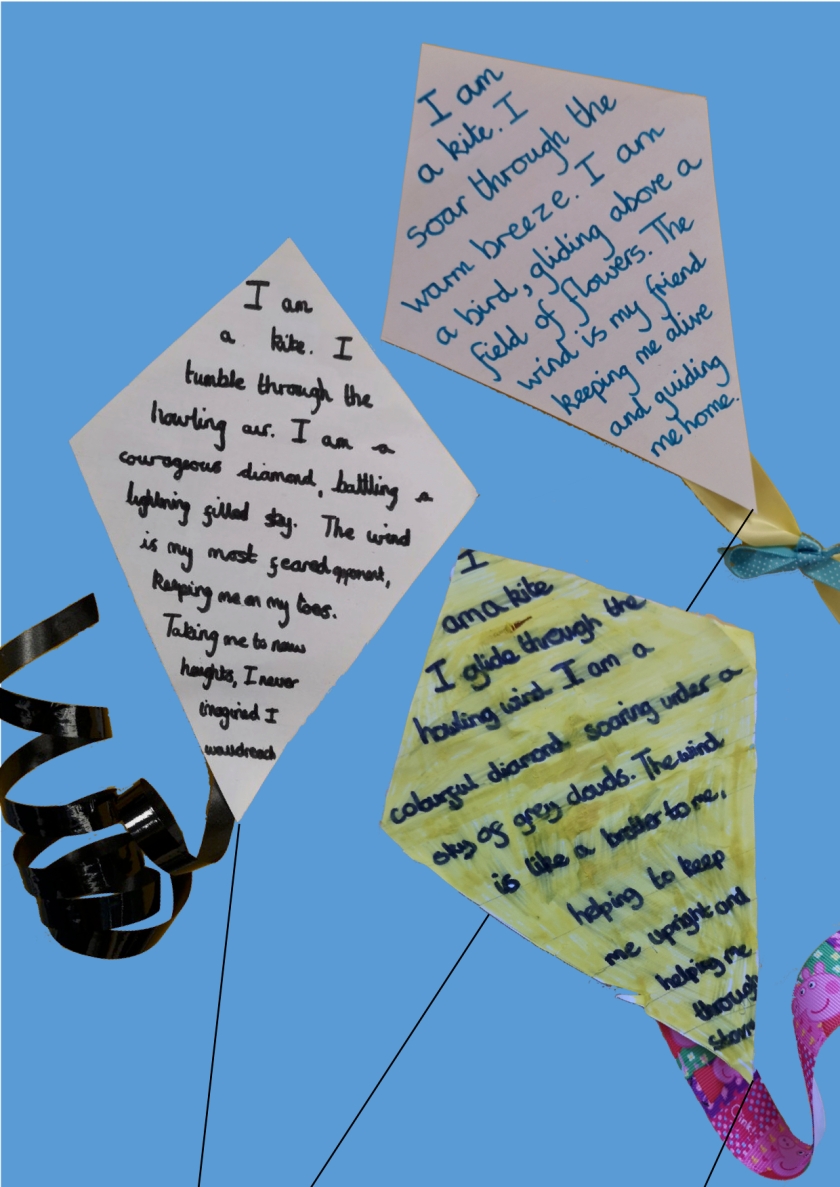
I am so pleased to say that red bubble at Farfield School, @SchoolFarfield have written some wonderful poems by following this idea! Look here they are, flying high!

Posted in Poetry Craft, Poetry Fun!

I am a Bird – Poetry with Craft!

This is a challenge to write about a living creature in the first person – as if you were that creature. I am going to be a bird – but you could also be a dolphin, a pig, a fish, a dog, or a frog. It does need to be something you can draw, because later, if you want to, you will make your poem into a mobile!

Keep your lines as short as possible.

The first line of your poem will say what you are.

I am a bird!

For your next line, think about what your choice has on the outside – mine has feathers, but yours might have scales, skin, fur or spines. Describe what these things can feel, but instead of saying ‘feel’ say ‘SEE’. My second line is:

my feathers can see the wind

In your third line, describe the way your choice moves- I have chosen fly, but it could be swim, race, jump, run, or hop, any movement your creature makes.

I fly

You are going to describe your creature moving  ‘through the dreams of’:

I fly through the dreams of

Then you need to think of whose dreams they move though –  grass, sea, waves, a stream?  My bird flies over trees. So I have decided on:

I fly through the dreams of trees

Next, choose an adjective to describe your subject. It could be a word that describes appearance or movement or emotion. I could say ‘leafy green’ or ‘swaying’ trees. But I have decided on:

I fly through the dreams of lonely trees

That is your third line finished.

This next line is your last line. You will use the noise your creature makes, and say why they make that sound – using another part of the animal. So if it is a dog, your line might be ‘I bark to make my legs run faster’ or if it is a fish, which cannot make a sound, use whisper – you might say ‘I whisper to tell my scales to shine’. My last line is:

I sing to fill my hollow bones.

So now you have a poem – this is mine:

I am a bird!

My feathers can see the wind

I fly through the dreams of lonely trees

I sing to fill my hollow bones.

Hooray! You might want to put your poem to one side for a day and see if any other ideas come to you. When you next look at it and read it out you might ‘hear’ something that doesn’t sound quite right which you can change. Read your poem to another person – that always helps.

When you are happy with your poem – this is the next step! You are going to make a poem mobile. You will need some fairly stiff A4 paper or card.

Take your paper and fold it in half.

Then fold it in half again:

Open it up and cut along the creases you have made so you have four pieces of paper – if you have large writing or think you will need more space, use two pieces of A4 cut in half.

Now you need to draw your animal four times!

Because I’m drawing a bird, I am using my card sideways on because it is a better shape for drawing a  bird. Make sure that whatever you draw, you make it as big as possible on the card. Remember, you need space to write your poem line on each animal! Here is how I drew my bird:

Next, cut your animal out:

And use it as a template by drawing round it for all the other animals:

Then cut the rest out – you should now have 4 creatures, all the same:

Now to write your poem on your animals! Write it in pencil first. One line on each creature. Decide where your writing looks best on your shape. Experiment until it looks right. Try writing with felt tip on a separate piece of paper like the one you have used, to see if the pen shows though. If it does, use a black crayon to go over your writing. If it does not show through, use felt tip. This is because you are going to write on both sides of your creature. When the felt tip is dry, rub out the pencil lines.

Then colour in your animals, both sides! Use coloured crayons if possible so the writing on your animals shows up.

Next you thread the animals together so they can hang from the ceiling or a window. Thread a thick needle with thick thread. This is embroidery thread. You could use thin ribbon or string and make holes with something else – put the holes near the edge but but be careful not to put the holes too near the edge.

I have threaded the needle and thread through the  middle top of the bottom animal. I have knotted the end of the thread.

Then I have come back through the bottom middle of the next animal up and knotted the thread when I have decided how long I want it to be – a couple of inches is enough:

Then I attached the next bird up in the same way:

When you get to the top bird thread a needle through and knot and leave the end loose for hanging where you want it to be.

Then you are read to put it up! Here is mine – because it is two sided, it doesn’t matter which way the birds turn, you can still read the poem!

I hope you enjoyed making your poem mobile! Of course, you don’t need to make the mobile, you can just write the poem – I’d love to see any poems and any mobiles you make!


Posted in Poetry Craft, Poetry Fun!

Tribble Poems on Pop-Up Cards

The Volcano

belched

behind a hand of smoke


Susan Eames, Helen Laycock, Liz Brownlee


A while ago I invented a type of poem which I called a ‘tribble’ (which might give you a clue to another of my loves!). I have played it with friends on a writing forum. One person comes up with a noun, (a naming word), the next a verb ( a doing word) and the last person finishes the poem off with a short phrase, that should contain an adverb or adjective (describing words), but could contain just another noun.

It’s an interactive way of writing a poem, and can be great fun, as others people’s ideas spark your imagination.

You could write one with your family, or you could write one with one other person who will choose the verb in the second line. Or you could write one entirely on your own. In that case, you need to write out lots of verbs (skipping, rolling, patting, singing etc), cut them out, and fold them in half, and choose one at random after you have chosen your noun.

I am setting you the task of choosing a nature noun. This is mine:

That tree

Ask someone else to look at your noun and add a verb ( a doing word). When I played this with Susan, she added ‘commands’.

That tree

commands

Then you add the last line. Keep it to as few words as possible.

That tree

commands

the birds to sing.

There! You have a tribble poem.

So – what to do with your tribble? A tribble is very short so it is easy to write inside a card. Why not make a pop-up card to display or to give to someone else? Choose the tribble you like best.

Start off with a piece of A4 paper, sturdy paper or card if possible.

Fold it in half. The card will have its long side fold at the top. This is what it looks like opened up:

Write your poem out neatly on a scrap of paper. See how large it is and how much space it will take up on your card. Make sure it only takes up half the space, less if possible. You will write your poem, not where you would normally write you signature, on the bottom, but on the TOP half of the card, on the left.

I wrote it in the card in pencil first, and decided to make the last line into two lines to take up less space.

Next, close your card and along the fold cut two parallel lines – about half way along the space left over from where you have written your poem. My lines were 3 and a half cm deep.

When you open up the card again, push through where you have cut from the outside – this is what it will look like:

Now you have to decide what you want to pop up when you open up your card. I decided on a tree, of course!  The tree or whatever you draw has to be small enough to stay inside the card when it is shut, but big enough to pop up and look good when it is open. Shut the card to measure how big your pop up with be. It has to be smaller than the distance between the bottom of the hole and the edge of the card.

The easiest way to make sure it will fit this space is to cut a piece of paper that big and draw what you want to pop up on it – making it as big as possible.

I did mine by cutting out two pieces of coloured card and making my tree fit the space.

I stuck the tree together. Then I drew a bird onto the back of a coloured piece of origami paper so it was lovely and bright when I cut it out and turned it over. Then I stuck it to the tree.

Then I stuck the tree to the pop up piece in the card, and added some details to the background – I also rubbed out my pencil lines.

When I open and shut the card it works beautifully. But on the outside of the card is a hole where the pop-up is.

This does not matter if you are just going to display it – but if you want to give it to someone you will need to fold another piece of paper to make a cover for your card.

You will probably want to draw on the cover, if it is to be a card! Do this first in case you make a mistake. Then you can stick it to the card or you could staple it.

You could also use the Tribble poem-writing idea to write poem to go in a tiny Poetry Book. Making a poetry book is easier than this!

Hope you enjoy doing this! I certainly did!